EnMaSSe Administrator Guide
Overview
This guide explains how to setup and administer the Environmental Monitoring and sensor storage (EnMaSSe) application.
This guide doesn’t cover how to use the system and it is recommended that administrators first read the user guides.
There are a number of integrated systems to setup and configure:
- Provisioning interface - This is the interface that end users will interact with.
- Ingester platform - Handles data streaming and data storage.
- ReDBox - Provides a host of metadata functionality including publishing to ANDS. ReDBox is an open source 3rd party software and only EnMaSSe specific configuration is included in this document.
- Shibboleth - Is a federated authentication system that wraps the application. Shibboleth is 3rd party software and only an overview of our experiences and recommendations are provided in this document.
- CC-DAM - Is the data storage implementation chosen for our implementation and deployment of EnMaSSe. CC-DAM is proprietary 3rd party software and out of the scope of this documentation, please contact CoastalComs for further information.
Log files can be found under:
- Provisioning intererface -> <install location>/src/jcu.dc24.provisioning/provisioning.log
- Ingester platform -> <install location>/src/jcu.dc24.ingesterplatform/platform.log
Installation & Configuration
The EnMaSSe system has source code in a number of repositories including:
- https://github.com/jcu-eresearch/EnMaSSe-Deployment.git
- https://github.com/jcu-eresearch/TDH-rich-data-capture.git
- https://github.com/jcu-eresearch/TDH-dc24-ingester-platform.git
- https://github.com/jcu-eresearch/jcu.dc24.ingesterapi.git
- https://github.com/jcu-eresearch/python-simplesos.git
- https://github.com/davidjb/ColanderAlchemy.git branch=davidjb
The good part is that deployment is provided using buildout which will pull the sources from all the associated repositories and set them up correctly.
Full deployment of EnMaSSe is documented and provided by the jcu-eresearch/EnMaSSe repository, a summary of the full instructions is:
- Install Python 2.7 with the required packages and development libraries (see repo for full commands).
- Checkout the EnMaSSe-Deployment repository.
- Create a virtualenv and pip install zc.buildout distribute uwsgi.
- Run buildout.
- Set the provisioning interface and ingester platform up as services.
Interface/Application
Configuration of the provisioning interface is provided through the production.ini file located in the base provisioning interface directory (<install location>/src/jcu.dc24.provisioning/production.ini).
Application specific configuration values (Compulsory items are bold):
| sqlalchemy.url | MySQL username, password, address and database. |
| ingesterapi.url | Address of the ingester platform, in most situations this shouldn’t change unless you require custom ingester platform configuration. |
| ingesterapi.username | Ingester platform username as configured. |
| ingesterapi.password | Ingester platform password as configured. |
| mint.location | Location of the Mint name authority for looking up users. |
| redbox.url | Location of the ReDBox installation. |
| redbox.search_url | Location of ReDBox search url (prepended to redbox.url) |
| redbox.alert_url | Location of the ReDBox alert url (prepended to redbox.url). ReDBox will read and ingest records when this url is hit. |
| redbox.ssh_host | SSH Address for the ReDBox server. |
| redbox.ssh_port | SSH port to use for connecting to the ReDBox server. |
| redbox.rsa_private_key | Location of the SSH Private key for the ReDBox server. |
| redbox.ssh_username | SSH username to use for connecting to the ReDBox server. |
| redbox.ssh_password | Either the SSH password or the private key password (may be blank if using an SSH key that isn’t password protected). |
| redbox.ssh_harvest_dir | Location to upload generated record XML files to. |
| redbox.local_config_file | Where the ReDBox field mappings file will be saved to. The mapping file is generated when the provisioning interface is started. |
| redbox.identifier_pattern | Prefix for all generated ReDBox identifiers. |
| provisioning.for_codes | CSV File that contains FOR codes. |
| provisioning.seo_codes | CSV File that contains SEO codes. |
| workflows.files | Location that file uploads are saved to, this isn’t contained in temp as some file uploads need to be persistent (such as files attached to project or method templates). |
| tmpdir | Temporary directory |
| pyramid_deform.tempdir | Temporary directory for pyramid/application specific files. |
| mint.tmpdir | Temporary directory for mint specific files. |
| redbox.tmpdir | Temporary directory for ReDBox specific files. This is used to write record XML to be transferred to ReDBox using SFTP. |
| session.secret | Secret/password that your session uses (random generated number). |
| host | (non-UWSGI server) IP Addresses that your server will accept. |
| port | (non-UWSGI server) Port that the provisioning interface can be accessed on. |
| base_dir | base installation directory of the provisioning interface |
| socket | (UWSGI server) IP addresses to accept and the port that the UWSGI container will be accessible on. |
Other settings can be changed as per their documentation:
- General pyramid (the framework) configurations: http://docs.pylonsproject.org/projects/pyramid/en/latest/narr/project.html#myproject-ini
- SQLAlchemy (database): http://docs.sqlalchemy.org/en/rel_0_8/core/engines.html
- pyramid_beaker add-on settings: http://docs.pylonsproject.org/projects/pyramid_beaker/en/latest/
- Logging configuration: http://docs.pylonsproject.org/projects/pyramid/en/latest/narr/logging.html
Web Server & Shibboleth
Shibboleth is a federated authentication service that sits in front of the application and injects user authentication headers.
Shibboleth requires a web server that supports CGI, JCU eResearch has chosen the NGINX webserver using Fast CGI to support Shibboleth.
The application login address is located at /login/shibboleth, shibboleth should be configured to handle authentication at this address and redirect back to the application when complete.
The EnMaSSe provisioning interface is based on Pyramid using a UWSGi container for production deployment.
ReDBox Integration
ReDBox is a research metadata repository that among other things, publishes research data nationally to Research Data Australia (RDA).
EnMaSSe integrates with ReDBox by exporting project metadata and per dataset metadata when a project is submitted and approved. The export occurs by:
- Converting the provisioning interfaces metadata tables into XML files.
- Uploading the files to the ReDBox server over SFTP (File transfer over SSH).
- Polling the ReDBox alert URL to start the ReDBox harvest.
Before EnMaSSe can integrate with ReDBox it requires a new alerts harvest configuration to be added within ReDBox and the SSH permissions and configurations to be set-up.
SSH Access
A new user should be created on the ReDBox server with a public key and write access to the enmasse-alerts folder (see alerts configuration). The actual steps to do this are operating system dependent but for a linux machine it would be something like:
- useradd <username>
- passwd <username>
- Copy/paste your public key into ~/.ssh/authorized_keys
- cd <enmasse-alerts location>
- sudo chown <username>:<username> ./
Once the new user has been created and has write permission the provisioning interface configuration file needs to be updated with the connection details:
- Open <install location>/src/jcu.dc24.provisioning/production.ini.
- Edit redbox.ssh_host to the server IP address or domain name (eg. example.com.au).
- Set redbox.ssh_port as configured on the server (default is 22).
- Set redbox.rsa_private_key to the fully qualified location of the private key that corresponds to the public key added above.
- Set redbox.ssh_username as the user created above.
- Set redbox.ssh_password as the SSH private key password (or leave blank).
- Set redbox.ssh_harvest_dir to the location of the enmasse-alerts folder (eg. /opt/deployment/redbox/home/harvest/enmasse-alerts)
- Update redbox.identifier_pattern to an appropriate identifier prefix for your organisation (eg. JCU uses jcu.edu.au/collection/enmasse)
Alerts Configuration
There are 2 steps to configuring the EnMaSSe alerts harvester:
- Copy the enmasse-alerts folder from the root folder of the github repository and add it to <redbox installation dir>/home/harvest/
- Update the <redbox installation dir>/home/system-config.json file as illustrated below:
{
        ...
        "houseKeeping": {
        "config": {
                "quartzConfig": "${fascinator.home}/quartz.properties",
            "desktop": true,
            "frequency": "3600",
            "jobs": [
                    ...
                    {
                        "name": "newalerts-enmasse",
                        "type": "external",
                                "url": "http://localhost:${jetty.port}/redbox/default/hkjobs/newalerts.script",
                                        "timing": "0 0 1 * * ?"
                        }
                ]
                }
    ...
    "new-alerts": {
        "alertSet": [
                {
                "name": "EnMaSSe Provisioning",
                "path": "${fascinator.home}/harvest/enmasse-alerts",
                "harvestConfig": "${fascinator.home}/harvest/enmasse-alerts/config/enmasse-dataset.json",
                "handlers": {"xml": "XMLAlertHandler"},
                "baseline": {
                        "workflow_source": "EMAS Alert"
                        "viewId": "default",
                        "packageType": "dataset",
                        "redbox:formVersion": "1.5.2",
                        "redbox:newForm": "true",
                        "redbox:submissionProcess.redbox:submitted": "true",
                        "xmlns:dc": "http://dublincore.org/documents/2008/01/14/dcmi-terms/",
                        "xmlns:foaf": "http://xmlns.com/foaf/spec/",
                        "xmlns:anzsrc": "http://purl.org/anzsrc/",
                        "dc:type.rdf:PlainLiteral": "dataset",
                        "dc:type.skos:prefLabel": "Dataset",
                        "dc:language.dc:identifier": "http://id.loc.gov/vocabulary/iso639-2/eng",
                        "dc:language.skos:prefLabel": "English"
                },
                "timestampFields": ["redbox:submissionProcess.dc:date"],
                "XMLAlertHandlerParams": {
                        "configMap": {
                                "xml": {"xmlMap": "${fascinator.home}/harvest/enmasse-alerts/config/enmasseXmlMap.json"}
                        }
                        }
                        }
                ],
        "baseline": {
                "viewId": "default",
                "packageType": "dataset",
                "redbox:formVersion": "1.5.2",
                "redbox:newForm": "true",
                "redbox:submissionProcess.redbox:submitted": "true"
        }
    ...
}
Project Management
A project workflow has been setup to encourage ease of use while allowing administrators to maintain a high quality of data and metadata.
EnMaSSe has the following possible states:
| State | Transition | Group/Permission | State Description |
|---|---|---|---|
| Open | Submitted | CREATOR/SUBMIT | Project is open for all users with write permission to edit. |
| Submitted | Open | Approve | ADMIN/REOPEN, ADMIN/APPROVE | Users have finished setting up the project and submitted it for administrator approval. |
| Approved | Disabled | AMIN/ DISABLE | Administrators have approved the project, ReDBox records have been created and data ingesters have been set-up. |
| Disabled | Approved | Delete | ADMIN/ENABLE, SUPER_ADMIN/ DELETE | Project has been disabled, stopping all ingesters from collecting more data. |
| Deleted | Project has been deleted, this action is restricted to super administrators. |
The intended workflow is illustrated below:
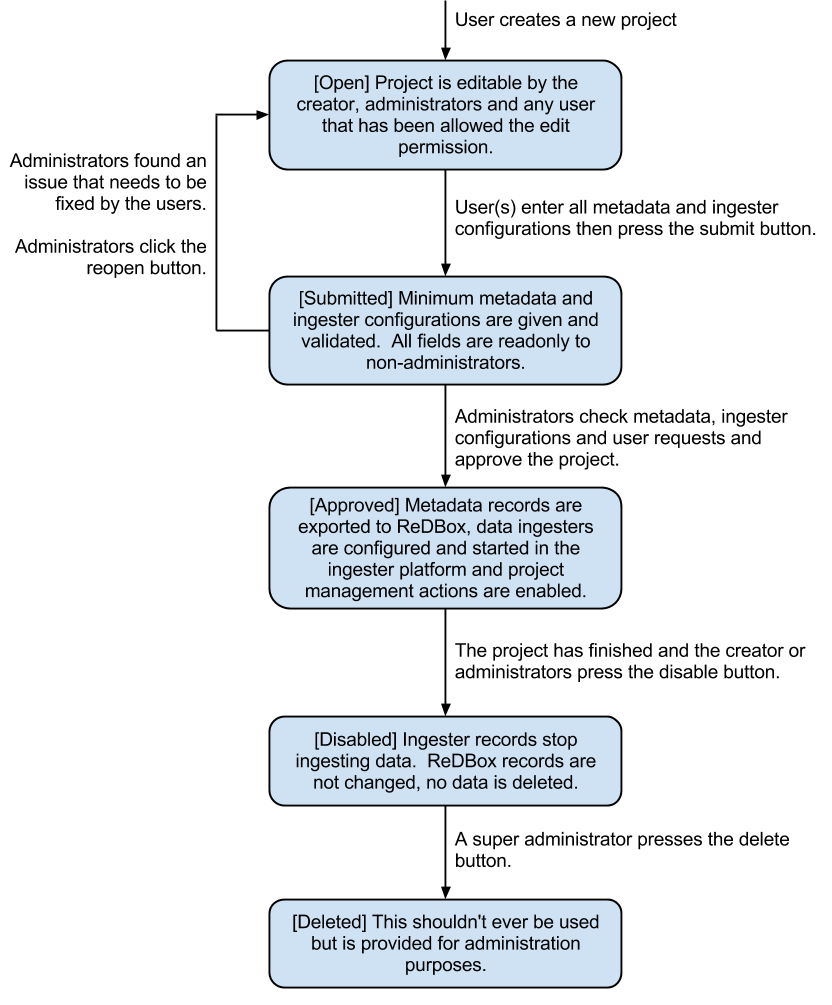
Figure 1: Project states and transitions.
The manage data and logs contextual options are only available in the approved state (please refer to the EnMaSSe user guide for more information).
Administrators (and any user with the ADVANCED_FIELDS permission) can view some additional fields that are usually hidden, at the time of writing these included usage rights, other licenses and access rights url (information page).
Editing Page Templates & Text
All pages are displayed from a view using form models and templates:
- Views describe what is displayed where and when, they are the logic behind the website.
- Models are abstractions of both forms/form elements and database tables (the data).
- Templates are what is actually displayed on the screen, they are the human readable representation of data.
- Stylesheet is the CSS stylesheet that makes the templates look good (eg. colours).
For changing text in a form you should look at the models section. To change static text or how things are displayed, look in the templates section. For menu text or page help, look in the views section. For styling such as colours, positioning and backgrounds look at stylesheets.
Please note that these files are written in python, HTML and CSS programming languages, you should be able to edit plain text for minor changes but may need developer support for anything more advanced.
Templates
Everything on the provisioning interface is displayed through templates in the <installation directory/src/jcu.dc24.provisioning/jcudc24provisioning/templates>:
- custom_widgets are templates developed for specific situations or pages and aren’t related to the frameworks used (deform).
- widgets are default framework (deform) templates, most have been modified in some way (mostly for placeholder text, help text and descriptions).
- templates in the base directory are individual pages or part of the framework for rendering pages.
custom_widgets and widgets control how form elements are displayed more-so than what is displayed such as a text input is displayed using the help, description and value as provided by the model (eg. text isn’t hard-coded).
Templates in the base directory are mostly hard-coded such that you can directly edit the text seen on the website.
Models (Database & Form)
Models are broken into 2 basic classifications:
- Project models are held in src/jcu.dc24.provisioning/jcudc24provisioning/models/project.py and describe how all forms are displayed as well as all project related database tables.
- src/jcu.dc24.provisioning/jcudc24provisioning/models/website.py contains general website forms and database tables (eg. authentication models).
For the most part you should be looking at:
- ca_help/help sets the text or HTML code under the ? symbol for that form element.
- ca_description/description set the text/HTML code that is displayed permanently below form element titles.
- ca_title/title sets the displayed title.
- ca_placeholder/placeholder sets the greyed out text that disappears when clicked.
- ca_force_required makes a form element required.
- If you see ca_child_... it means that this element is a sequence (can add elements by clicking the add button) and the added value will be used on the item added rather than the sequence itself.
- If you see ca_group_... it is grouping this and following elements together (for display purposes) and the set value will be used on the grouping rather than the element itself.
Specifics of all models and the underlying frameworks is relatively complicated, if you would like more information please refer to the developer guides.
Note: All changes to models won’t take effect until the application is restarted.
Views (Display & Logic)
Views are also split between project pages and general website pages:
- src/jcu.dc24.provisioning/jcudc24provisioning/views/view.py contains general website pages such as the dashboard, login and help.
- src/jcu.dc24.provisioning/jcudc24provisioning/views/workflows.py contains project specific views such as creating new projects, configuring the project and managing project data.
Page help is set by the page_help value passed into self._create_response(page_help=<help>), this value is usually set in a page_help variable at the top of the view.
Menu text for project pages is found at the top of the workflows.py page, contextual options are set in WORKFLOW_ACTIONS and project configuration menus are set in WORKFLOW_STEPS:
- title sets the menu text itself.
- page_title sets the page heading as well as the browser tab text.
- tooltip sets the pop-up text when you hover the mouse over the menu.
For more information please refer to the developer guide.
Note: All changes to views won’t take effect until the application is restarted.
Stylesheet
The stylesheet is located at:
src/jcu.dc24.provisioning/jcudc24provisioning/static/template.css.
Stylesheets are used in almost all websites and there are many CSS guides available on the web for reference.
A quick hint is to right click on the element you want to change and click inspect element or similar (supported in most modern browsers), look for a CSS button and you will see what/how the website elements look is being set.
User Roles & Permissions
By default there are 2 roles available:
- ADMINISTRATOR’s have all permissions except EDIT_PERMISSIONS and DELETE.
- SUPER_ADMIN’s have all permissions.
There are also 2 dynamic roles that aren’t assigned to users:
- AUTHENTICATED is any user that has logged in.
- CREATOR is the user that created the project.
Default roles, permissions and authentication is configured in src/jcu.dc24.provisioning/jcudc24provisioning/controllers/authentication.py.
Actual permission, rolem user and other authentication databases are located at src/jcu.dc24.provisioning/jcudc24provisioning/models/website.py.
At the stage of writing there is no user interface for managing user permissions and roles (except the sharing page which are only a subset and per-project). Configuration will need to be done on the database directly.
Managing Templates
There are two types of templates within EnMaSSe as well as standardised fields (or parent data schemas):
- Project templates allow the pre-filling of all data in a project.
- Method templates pre-fill both methods and any datasets associated with them.
- Standardised fields are pre-made data configurations that allow users to select common types of measurements/fields easily. This not only encourages users to standardise their data but also increases the ease of searching the data portal.
Templates provide administrators a generic way of providing users with partially complete projects and methods/datasets.
The way templates work is by using a preconfigured database entry to pre-fill newly created projects or methods and datasets.
Project Templates
At the time of writing there is no administration interface for project templates and the database will need to be edited directly.
To make a project into a template a new entry needs to be added to the project_template table linked to the relevant project.
Project templates should have an appropriate name and description and they can be grouped by using the same category.
All fields in the associated project will be pre-filled on any project that uses this template.
Method Templates
At the time of writing there is no administration interface for method templates and the database will need to be edited directly.
To make a method into a template a new entry needs to be added to the method_template table linked to the relevant method.
Method templates should have an appropriate name and description and they can be grouped by using the same category.
Method templates may also be linked to a dataset.
All fields in the associated methods and datasets will be pre-filled on any method that uses this template.
Standard Data Configuration Fields
At the time of writing there is no administration interface for method templates and the database will need to be edited directly.
To make a data configuration into a standardised field its method_schema row needs to be updated with a template_schema value of 1.
Standardised fields are hierarchical such that each data configuration may have many parents each of which add their associated method_schema_field’s and parent method_schema’s.
This means that similar data configurations can be reused for similar data streams and their data would be cross searchable. Or common data configurations could be standardised so that no custom configuration is needed at all for compatible methods.